Showing posts with label My Digital Studio. Show all posts

2.04.2014

Artisan Wednesday WOW *valentine's decor*

 photo 02-Feb-Blog-Hop-Button_zps62e6d63d.png
Welcome to the 2014 *February* edition of the Wednesday Artisan Blog Hop.  Check back every Wednesday to see new projects that all 10 of the Stampin' Up! Artisans have created. 

Follow Me on Pinterest
Follow the 2013 Artisan Design Team Pinterest Board:


Are you still loving the new Mini Catalog?  Lurve!!

GORGEOUS.

I am in LOVE with hybrid MDS projects - especially when you put it on wood.  L O V E!!

 photo 201402Artisan1acopy_zps3644c6d2.jpg
Painting on wood is SO easy!!  I only paint 1 coat of paint and then sand the edges.
   photo 201402Artisan1aacopy_zps86d8daab.jpg  photo 201402Artisan1bacopy_zps9efb4ad0.jpg
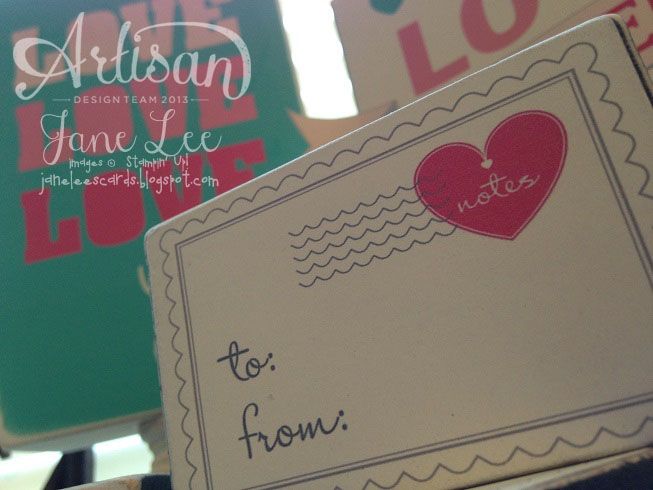
Love Love Love you Block = 4" x 6".
 photo 201402Artisan1cacopy_zpsd5f4c4f5.jpg photo 201402Artisan1ccopy_zpsdbfbea04.jpg

Love Letters Block = 4.125" x 3".
To create your stands, here is the formula:
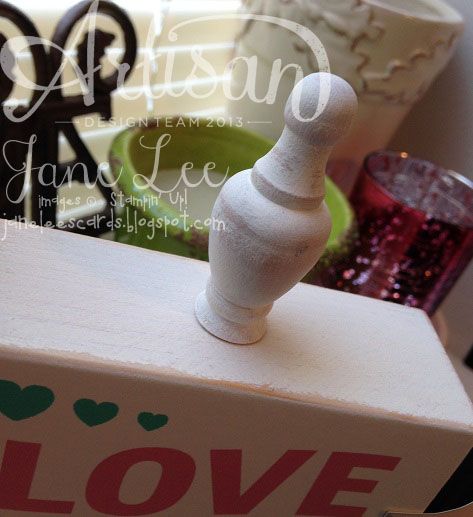
Circle base + candlestick base + hybrid block + knob.
Is it a knob?  I don't know what it really is.
Cute.  Yes, just cute topper.
 photo 201402Artisan1dacopy_zpsb9be8551.jpg  photo 201402Artisan1dbcopy_zps274d37ee.jpg
ABC i {heart} u = 3" x 2".
Wood glue is your best friend.
  photo 201402Artisan1ecopy_zps79eb4e4c.jpg 
Yeah, I'm in love with the little envelopes.  I might have made 20 a few.  photo 201402Artisan1eacopy_zps84b6c76c.jpg  
Photobucket
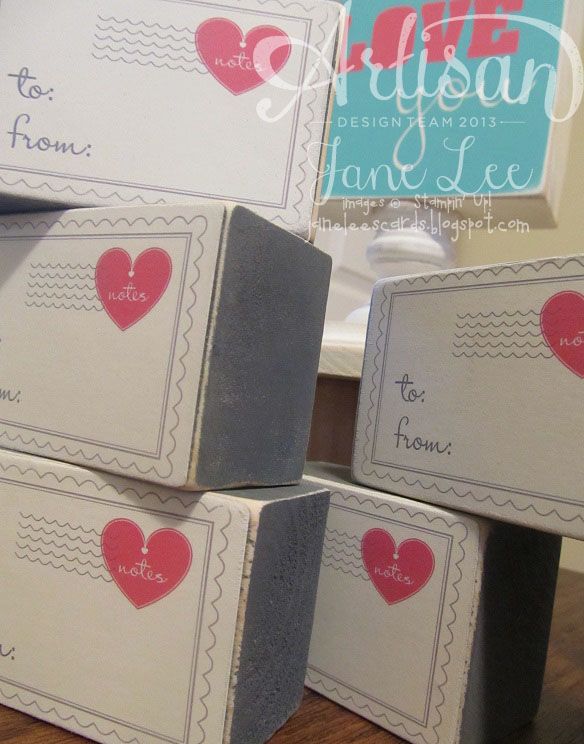
MDS: My Digital Class Mailbox Love Notes
Paper:  Very Vanilla 
Accessories & Tools:  Stampin' Sanding Block
Other: Vanilla Paint, Light Gray Paint, Wood Pieces from The Wood Connection, Mod Podge, Wood Glue
 
Order everything from my site {HERE}

Go back and visit my fantastic friend Erica's blog or move on to the next blog and visit Jeanna's.  I'm so lucky to be sandwiched between two of my great friends.

 photo 02-Feb-Blog-Hop-NEXT-Button_zps8e64a22d.png

 Do you follow me on Pinterest?  You can.
Follow Me on Pinterest 


Did you order your Paper Pumpkin yet?
Full project kits delivered straight to your door.
What are you waiting for??
 photo PaperPumpkin_zps597f6607.jpg 
Follow on Bloglovin

Signature-stampsite photo Artisan-janeleestampinupnet_zps55ff3be1.png

1.07.2014

Artisan Wednesday WOW *i miss you already*


January Post photo 01-Jan-Blog-Hop-Button_zpsfd9519da.png
Welcome to the 2014 *January* edition of the Wednesday Artisan Blog Hop.  Check back every Wednesday to see new projects that all 10 of the Stampin' Up! Artisans have created. 

Follow Me on Pinterest
Follow the 2013 Artisan Design Team Pinterest Board:


Holla!!  It's January.  I feel like time is going SO fast!!  It'll be summer before we know it!  Anyway...  Are you loving the new Mini Catalog?

GORGEOUS.

Hi.  Hello.  I am in love with the new wooden embellishments AND the word bubble framelits.
L.O.V.E.

 photo 201401Artisan1acopy_zps31a5aefb.jpg 
   photo 201401Artisan1bcopy_zps823476cd.jpg
I created these adorable hearts using my Silhouette Cameo.  Here is how you can create the same thing:
  1. Create a rectangle that will be the size you'd like your top layer to be cut.  Mine is 3.25" x 4.75".
  2. Import the heart from the Bookstagram MDS download into your program.
  3. Resize your heart to be .25" wide.
  4. Open your trace window  photo 01-14SubtractionTuted_zpsaedafcc0.jpg
  5. Click Select Trace Area
  6. Then click Trace Outer Edge
    You should have a red outline around your heart.
    You can move your black heart out of the way.
  7.  Click the red outline of the heart and create several duplicates.  I just placed them randomly all over the square.  I made sure to have some hearts go outside of the square too.A photo 01-14SubtractionTuteacopy_zps3ac724a7.jpg
  8. Click the Select arrow on your toolbar.
  9. Draw a square around your rectangle with hearts in it.
  10. Your rectangle and all the hearts should have outlines around them.B photo 01-14-Subtraction-Tute-b_zps0f2e65a7.png
  11. Click the Open the Modify Window.
  12. Click the Subtract option.
  13. Your screen should look like this:C photo 01-14SubtractionTuteccopy_zps44960c5b.jpg
  14. Now you can cut your project.
If you saw this post earlier you're probably thinking,"Wasn't there some twine on this card that looked like a guppy fish?"  Yes, there was, but I had to fix it.  I just couldn't stand it. Yay!

Are you wondering what I did with all the cute little hearts that were cut out?  They're on the inside of the card, of course.

Photobucket

MDS: Bookstagram - Heart
Stamps:  Just Sayin'
Ink:  Melon Mambo, Jet Black StazOn
Paper:  Whisper White, Coastal Cabana, Watercolor Paper
Accessories & Tools:  Aqua Painter, Big Shot, Word Bubbles Framelits, White Baker's Twine, Wooden Elements Embellishments, Dimensionals, SNAIL Adhesive, Glue Dots
Other: Ecutter
Order everything from my site {HERE}

Go back and visit my fantastic friend Erica's blog or move on to the next blog and visit Jeanna's.  I'm so lucky to be sandwiched between two of my great friends.
January Next photo 01-Jan-Blog-Hop-NEXT-Button_zps1d716656.png
 Do you follow me on Pinterest?  You can.
Follow Me on Pinterest 


Did you order your Paper Pumpkin yet?
Full project kits delivered straight to your door.
What are you waiting for??
 photo PaperPumpkin_zps597f6607.jpg 

Signature-stampsite photo Artisan-janeleestampinupnet_zps55ff3be1.png

3.15.2013

Leadership Sample - Part 8

 photo LeadershipButton-001_zps4f305548.png 

Enjoy!!

I was able to crop 2 different stamps to create my last name.  I love how it turned out!
{click for a larger view}
 photo SABScrapbook2-001copy_zpsca7311c0.jpg
Photobucket
Embellishments
    _Designer Kits\Lemonade Stand - embellishments\Lemonade Stand - paper ribbon 1
    _Designer Kits\Lemonade Stand - embellishments\Lemonade Stand - stitching 1 (re-colored)

Stamps
    _Designer Kits\Lemonade Stand\Lemonade Stand - honeycomb, Color = 0,0,0
    _Designer Kits\A Split Second\A Split Second - flag, Color = TANGERINE TANGO 243,114,82
    _Designer Kits\Lemonade Stand\Lemonade Stand - la, Color = WHISPER WHITE 255,255,255
    _Designer Kits\Lemonade Stand\Lemonade Stand - sweet baby, Color = WHISPER WHITE 255,255,255
    _Designer Kits\Lemonade Stand\Lemonade Stand - i heart this
    _Designer Kits\Lemonade Stand\Lemonade Stand - heart, Color = WHISPER WHITE 255,255,255

Punches
    Extras\Flag Punch,  Filled with: Designer Series Paper\_Designer Kits\Sycamore Street - designer series paper\Sycamore Street - 1
    Extras\Flag Punch,  Filled with: Designer Series Paper\_Designer Kits\Lemonade Stand - designer series paper\Lemonade Stand - 3

Photos
    Designer Series Paper\_Designer Kits\Downtown Grunge - designer series paper\Downtown Grunge - 1
    Designer Series Paper\_Designer Kits\Sycamore Street - designer series paper\Sycamore Street - 8
    Designer Series Paper\_Designer Kits\Lemonade Stand - designer series paper\Lemonade Stand - 3 


Do you follow me on Pinterest?  You can.

Follow Me on Pinterest
PhotobucketPhotobucket photo PaperPumpkin_zps597f6607.jpg

3.14.2013

Leadership Sample - Part 7


 photo LeadershipButton-001_zps4f305548.png 


Enjoy!!
{click for a larger view}
 photo SABScrapbook1-001acopy_zps0807f2ec.jpg

Photobucket
Embellishments
    _Designer Kits\Lemonade Stand - embellishments\Lemonade Stand - stitching 1 (re-colored)
    _Designer Kits\Lemonade Stand - embellishments\Lemonade Stand - paper ribbon 1

Stamps
    _Designer Kits\Lemonade Stand\Lemonade Stand - honeycomb, Color = 0,0,0
    _Designer Kits\Lemonade Stand\Lemonade Stand - i heart this, Color = VERY VANILLA 254,249,232
    _Designer Kits\A Split Second\A Split Second - flag, Color = TANGERINE TANGO 243,114,82
    _Designer Kits\Lemonade Stand\Lemonade Stand - 2, Color = WHISPER WHITE 255,255,255
    _Designer Kits\Lemonade Stand\Lemonade Stand - 0, Color = WHISPER WHITE 255,255,255
    _Designer Kits\Lemonade Stand\Lemonade Stand - 1, Color = WHISPER WHITE 255,255,255

Punches
    Extras\Flag Punch,  Filled with: Designer Series Paper\_Designer Kits\Lemonade Stand - designer series paper\Lemonade Stand - 5
    Extras\Flag Punch,  Filled with: Designer Series Paper\_Designer Kits\Sycamore Street - designer series paper\Sycamore Street - 1

Photos
    Designer Series Paper\_Designer Kits\Downtown Grunge - designer series paper\Downtown Grunge - 1
    Designer Series Paper\_Designer Kits\Sycamore Street - designer series paper\Sycamore Street - 8
    Designer Series Paper\_Designer Kits\Lemonade Stand - designer series paper\Lemonade Stand - 3


Do you follow me on Pinterest?  You can.

Follow Me on Pinterest
PhotobucketPhotobucket photo PaperPumpkin_zps597f6607.jpg

3.05.2013

Artisan Wednesday Wow

 photo ArtisanBlogLogos-Main_zps05ee95e2.png
Welcome to the March, Wednesday Artisan Blog Hop!  Check back every Wednesday to see new projects that 10 Stampin' Up! Artisan's have created.  Did you just come from Heidi's blog?  That girl has got some MAD skills!  I love everything she creates!

This is my facebook project for the Stampin' Up! Artisan board:


I usually craft with the motto that “more is better.”  Sometimes more isn’t always better.  I like how this scrapbook page doesn’t have a lot of elements yet it has enough.  I feel like every part of the page stands out and supports the photo of my goofy nephew.  I love banners.  I love hexagons.  Put them together on one page?  Perfect.


If you haven’t purchased MDS 2+ yet, get it now.  You can recreate this entire page with the MDS 2+ content and then get the Sale-A-Bration Lemonade Stand Digital Disc for FREE!

{Close up of the banner.  Luh-huh-huve this!}
 photo 201302Artisan04bcopy_zpsf342388a.jpg

Photobucket

Digital Program:  MDS 2+
Digital StampsSAB Lemonade Stand - Honeycomb, Hooray, Heart
Digital Papers:  SAB Lemonade Stand, SAB Sycamore Street
Digital Background:  Downtown Grunge - Downtown Grunge - 4
Digital Embellishments:  Staple & Stitching - White - Simple Stitches Circle 1, Downtown Grunge - Frame 4
Digital Punches:  Flag, Hexagon
Free Font: Mathlete Bulky
Order everything from my site {HERE}

Now head on over to Jeanna's blog.  I love love LOVE her and all her projects.  I promise you will not be disappointed.

 photo ArtisanBlogLogos-keepclicking_zps5f5c3b37.png
Do you follow me on Pinterest?  You can.


Follow Me on PinterestPhotobucket   Photobucket   

naptimestamper@gmail.com