
Welcome to the 2014 *March* edition of the Wednesday Artisan Blog Hop. Check back every Wednesday to see new projects that all 10 of the Stampin' Up! Artisans have created.
Most of the items on this project are from the Mini Catalog? Lurve!!
If you follow my blog you will probably notice that most of my projects have banners, grunge, crumpled paper, distressed ink, etc. Every once in a while I'll throw in a project with clean lines but that's just like a palette cleanser for me. You know? How often do you see me create projects with flowers?
Not often.
I'm in a house filled with boys. Even our dog is a boy (well, male - but you know what I'm saying.)
Sometimes I forget how to be girly.
Sometimes I forget that I can make things pretty.
When I got the March Artisan Box, 90% of it was flower stamps, flower punches, floral paper, flowers, flowers, FLOWERS.
I'll just admit that I thought,"Wow. Ugh. Flowerzzzzz. Flerppp."
Ok, but then I used the Spiral Flower die with the Canvas Creations sheet and something magical happened and this box pretty much created itself. What the crazy??!! I made this project and have fallen in love with flowers. So prepare for a month of projects mostly related to flowers or floral something.
I warned you.
Behold:


Are you wondering how I made my rad tag? Are you pickin' up what I'm puttin' down? I just trimmed the scallop tag punch. See??


Eh?? See?? Nice little leaves made with the circle punch. Ta da!
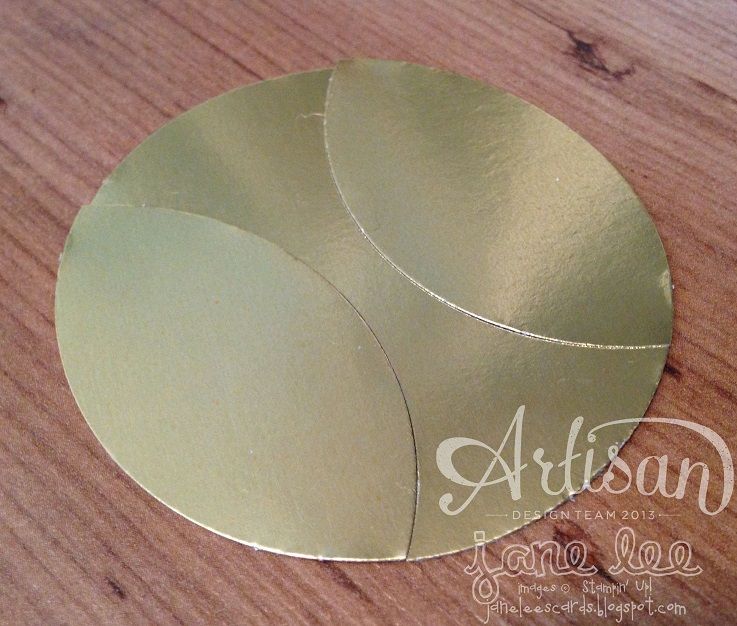
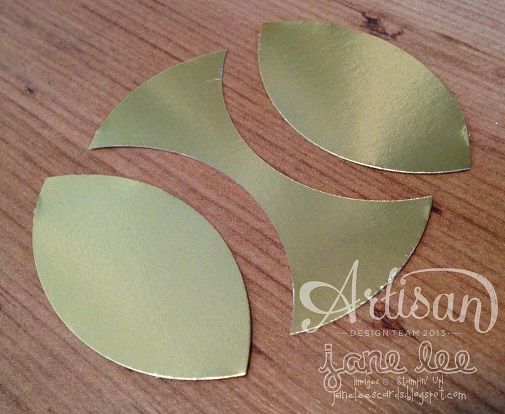

To make the petals of your blossom, cut a line to the center of your circle and then make a little cone with your circle. The taller your cone, the taller your blossom. Try all different heights until you find the one you like.

Start assembling your blossom in a circular pattern (with hot glue, of course). Keep adding circles until you are satisfied with the size of your blossom. I have smaller punched circles in the center than I do on the outer edges.


I know. I know.
Take it in slowly.
In person this gift is adorable, fancy, swanky, sweet, pretty, lovely, and chic. Ok, can you tell I love it? I just feel happy every time I look at it. I look at it a lot.
A.
Lot.
I LOVE IT!!
It's SO not me and yet I still feel like it's SO me.
That's deep.

Stamps: Simply Celebrate
Ink: Gold Encore! Ink Pad
Paper: Calypso Coral, Crisp Cantaloupe, Basic Gray, Gold Foil, Whisper White
Accessories & Tools: Canvas Creations, Delicate Details Lace Tape, Kraft Gift Boxes, Mini Brads, Paper Piercer, Gold Baker's Twine, 2-1/2" Circle Punch, 1-3/4" Circle Punch, Scalloped Tag Topper Punch, Petite Petals Punch, 3/16" Corner Punch, Big Shot, Spiral Flower Originals Die, Snips, Dimensionals
Other: Sewing Machine, White Thread, Hot Glue Gun
Order everything from my site {HERE}
Go back and visit my fantastic friend Erica's blog or move on to the next blog and visit Jeanna's. I'm so lucky to be sandwiched between two of my great friends.
Do you follow me on Pinterest? You can.
Did you order your Paper Pumpkin yet?
Full project kits delivered straight to your door.
What are you waiting for??

MEEE-yow!! Wowza! I love it!! A definite show piece!
ReplyDeleteThis is so FREAKING CA-YUTE girl! Love it!!!! Love it!!!! Love it!!!
ReplyDeleteI am pickin' up what you are puttin; down. Yes, I am!
ReplyDeleteso many fun things to try! Way to go Jane!
ReplyDeleteAAAAAAAMAZING!
ReplyDeleteStunning! No need to put anything inside the box - it IS the gift!
ReplyDeleteFABULOUS!!!!!!! Gorgeous, beautiful, wonderful, amazing....does that work? For a gal who says she is not girly, you certainly turned out a VERY girly flower!
ReplyDeleteJane...you are a crazy closet flower freak! Ha Ha Ha! I LOVE IT! It is so FANCY!
ReplyDeleteJane, this is amazing and YOU are amazing. I love everything about this! All of your attention to detail is just stunning.
ReplyDeleteOh Jane! You are so sweet! I can't believe you went to all that work to make me such an amazing little gift! Thank you sooooo much! I will be keeping this box FOR-EV-ER! Oh, wait, it is for me, right?! ;)
ReplyDeleteLove it! Another beautiful project!
ReplyDeleteGor-jus!!!
ReplyDeleteBeautiful!
ReplyDeleteJane, I am sending you a whole bunch of hugs!!!! I'd been sorry to have sold one of the flower punches, because it made excellent leaves. Thanks for your GREAT idea, using the circle punch - a whole avenue of possibilities just opened up!
ReplyDelete