
Welcome to the 2013 *September* edition of the Wednesday Artisan Blog Hop. Check back every Wednesday to see new projects that all 10 of the Stampin' Up! Artisans have created.
You can probably tell by now but a lot of the items in the Artisan Box this month were Halloween. I loooooove making Halloween projects. I can't wait to decorate my house for Halloween. My decorations are really fun and this project I created will fit right now.
Everyone needs cute Halloween decor, right? Right. So this is how you can easily make your own.
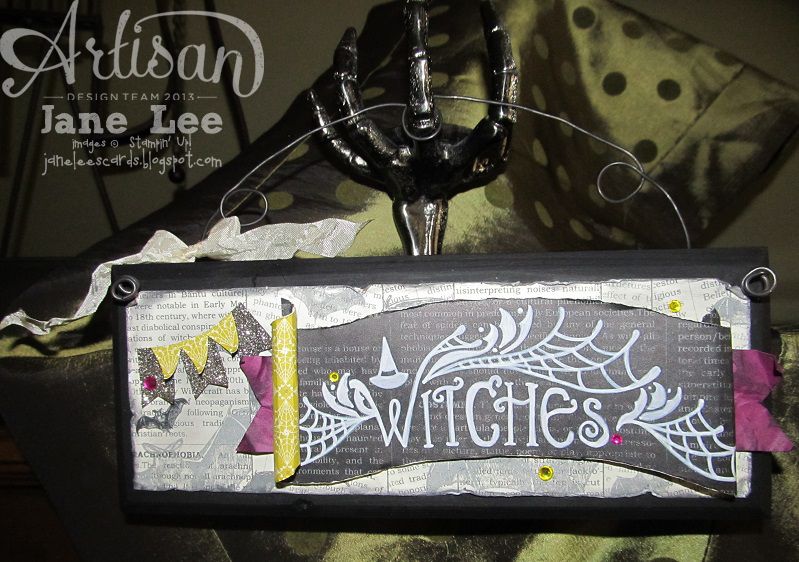
This wood block is 8.5" x 3.5". Perfect for any wall hanging or display piece on a shelf or mantle.
Do you recognize the "Witches" banner?
Everyone needs cute Halloween decor, right? Right. So this is how you can easily make your own.

This wood block is 8.5" x 3.5". Perfect for any wall hanging or display piece on a shelf or mantle.
Do you recognize the "Witches" banner?

Recognize it now? It's from the Witches' Brew Digital Download.
A little time consuming but this is how I "clipped" the webs and wording at the top.
- Insert the portion of the DSP you want into a Photo Box in MDS.
- In photo effects, invert the colors. This will turn all your whites black and vice versa.
- Export new image to a pdf.
- Open in PhotoShop (this is just what I did but I'm sure you could use another software that will let you edit images.)
- Crop OUT images you don't want - like the Candy Shoppe etc.
- Delete out background specs you don't want.
If you do all those things, you'll get this:

I was feeling pretty fancy at this point. By the way, this idea just popped into my head one night and I tried it the next morning and it worked. LOVE it when that happens!
- Print your new image on DSP. The image is black and the DSP I printed it on was black so I had to look for the shinky parts of the print.
- Trace very carefully with your White Chalk Stampin' Write Marker.

That's it! It's a simple process but it does take a while. I can't wait to try this on more images. I love how it turned out!

Wanna create custom colored glimmer paper?
Easy.
Drop 30 droplets of ink in a Stampin' Spritzer. Fill the rest of the Spritzer with Alcohol (this helps with the drying process.) SHAKE/Mix well! Then spritz your silver glimmer paper. The paper will hold the color of the ink. I used Basic Black.
LOVE!
Also, I'll just put in a small plug for dimension: This project would look totally different if I just stamped on paper and left it flat. Give your projects dimension by crumpling, curling, using dimensionals, etc. DO IT!
Colored rhinestones? Easy. Color our Basic Rhinestones with any color Sharpie and they will look AMAZING!

MDS: Witches Brew DSP Digital Download
Ink: Basic Gray, Basic Black Ink Refill
Paper: Rich Razzleberry, Silver Glimmer Paper, Witches' Brew DSP
Ink: Basic Gray, Basic Black Ink Refill
Paper: Rich Razzleberry, Silver Glimmer Paper, Witches' Brew DSP
Accessories and Tools: White Stampin' Chalk Marker, Basic Rhinestones, Very Vanilla Seam Binding, Stampin' Spritzer, Petite Pennants Builder Punch, Sponge Daubers, Paper Snips, Dimensionals, Glue Dots, Sticky Strip
Other: Yellow Sharpie, Maroon Sharpie, Wood Block & Wire, Alcohol (for fast drying while spritzing), Black Paint
Order everything from my site {HERE}
Go back and visit my fantastic friend Erica's blog or move on to the next blog and visit Jeanna's. I'm so lucky to be sandwiched between two of my great friends.

Do you follow me on Pinterest? You can.
Did you order your Paper Pumpkin yet?
Full project kits delivered straight to your door.
What are you waiting for??
Jane, this is so cute...I love everything about it!
ReplyDeleteYou.be.GENIUS!!! LOVELOVELOVE!! HEARTS and HAPPY FACES!! Brilliant, Jane!
ReplyDeleteYou. Are. Brilliant. Seriously girl- this is over the top!
ReplyDeleteThis is awesome! I LOVE it!
ReplyDeletePure awesomeness!!!!!
ReplyDeleteLove all of your crumples, curls and distressed edges! This project is seriously amazing Jane! Love it!
ReplyDeleteAmazing work - I just colour my glimmer paper with my markers but will give your technique a go!
ReplyDeleteHoly smokes this is Serious Creativity At Work!
ReplyDelete